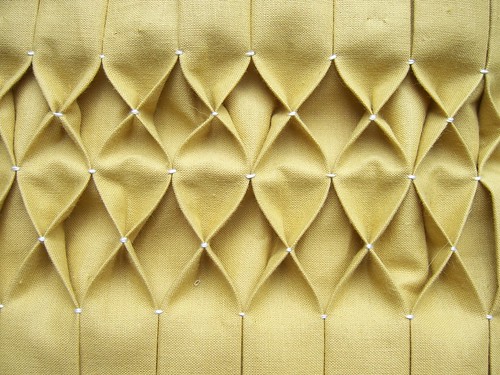
I think you could also call it Honeycomb Pleating.
I made this tutorial, because there really weren’t too many others out there, and I really like my method. The thought of pleating an entire piece of cloth back-and-forth and back-and-forth makes my hands feel all full and frustrated. My way is not that way. I would like to introduce you to the recycled Cheerios box method, in which a cardboard strip does most of the thinking work and the whole thing is laid flat rather than folded up in your hands.
Materials:

- fabric: your desired height x 3 times your desired width. I’m making a fourteen inch pillow, and I decided to play it safe by cutting a 18 x 54 in. piece of fabric. Your fabric should be cotton or something else that can stand up to a good bit on ironing. No melty fabrics.
- embroidery floss
- quilting ruler or yardstick
- disappearing ink marking pen or light pencil
- thin cardboard, like from a cereal box
- iron and ironing board
- spray starch
- straight pins
Step 1: cut your cardboard strip

Cut your cardboard into a long, thin strip. I made mine 3/4 inches wide by 20 inches long. Ideally you want your strip to be longer than your fabric, but this is not a necessity. If you want wider pleats, make your strip wider than 3/4 inches.
Step 2: the first press
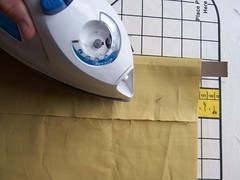
Use light starch for all pressing.
Lay your fabric on your ironing board so that the short edge is parallel with the sides of the board the long edge falls down in front of you. Place the cardboard strip across your fabric, about 3 inches from the short edge. Fold the 3 inches over the cardboard strip. Press, using the strip as a straight edge for a nice, crisp pleat.
Step 3: the second press

Remove cardboard and flip your work over. Now the extra fabric falls over the far side of the ironing board. Slide the edge of the cardboard onto the fold line made by the first press. Fold the long side of your fabric halfway onto the cardboard strip and then back on itself. Press.
Step 4: the pleat press

Remove the cardboard and flip your work over (again!). Tuck the cardboard into the little fold you just made. Your cardboard should be halfway covered by the fabric. Fold fabric up around the other side and back on itself. Press. Turn your fabric over to see that you have made a full pleat! Cool.

Keep making pleats until you are 3 inches from the far edge or pleating reaches your desired width. Remember to use starch—it’s your friend. Once you have a few pleats, you’ll probably want to put some straight pins in your work to keep it from unfolding as you flip it over and over.

Step 5: mark it

Lay your ruler across your work, about 2 inches from the top, perpendicular to the pleats. Using the disappearing ink marking pen or the pencil, make a little mark on each place where two pleats meet. Then mark the next row. The length between rows should be double the width of your pleat. My pleats were 3/4 in. so I made 1.5 inches between rows. If you’re using a pencil, make really light, tiny marks so they don’t show later. If you’re using a disappearing ink pen, just make a couple rows at a time so they don’t disappear before you can sew them!
Step 6: sew flat pleats

Thread a needle with two strands of embroidery floss. On the top row, on the first mark of the row, sew up through all layers on one pleat and down through all layers of the touching side of the adjacent pleat. Repeat stitch in the same place in order to tack the pleat in place. Continue across the row, then for all rows until the smocked portion of the work is the desired size (in my case, about 13 inches).
Step 7: sew pinch pleats

Start at one corner of your smocking. From the back, wiggle your threaded needle up through one of the flat folds of your pleat, centering your needle between two stitched rows. Pinch the pleat so that the sides come up and make an X. Make a tiny, stitch right in the center of the X. Stitch through it again to tack it down. Wiggle your needle down into the flat fold opposite where it came up. Repeat, pinching all pleats in your work.

Taa-daa! You’ve done honeycomb smocking.


{ 276 comments }
OMG. I can not wait to try this. Thank you.
me too. This tutorial is amazing, I never thought I’d be able to do this, and now I think I can! Great! Thanks loads.
What a wonderfully written tutorial. I’m bookmarking this to try it someday. Thanks!
Oh, very nice tutorial!! I love this – it’s kind of like smocking backwards… sort of!
Thanks!!
Very cool! I’ve been wanting to try out smocking for a long time but was intimidated. Your tutorial makes me feel like I could actually do it — very clear and great photos!
Very clever and beautiful too! I’d love to see your finished project.
MGM
Wow! I always wondered how to do it! thanks.
That Rocks!
Where was this in July?? a few months ago, I wanted desperately to do this to some curtains that I was making. I had lots of excess material, and had the choice of cutting them to window length and smocking, or having them puddle on the floor. After searching the internet for HOURS, i gave up and just cut them long and they puddle now.
I loved your simple approach to this, and i will certainly try again now on something else. Thanks!
A Gazillion thank-yous! Smocking is right at the top of my to-learns. This is beautiful :)K
no way! this is so good. i never imagined this would be something i’d want to endeavor even though i love smocked tops on little gals, but i think you’ve convinced me. so many thanks!!
wow – that seems easier than it looks when it’s finished. i think i could do that. what a great tutorial! thanks!
Brilliant! Thanks!
What a wonderful, pricise work. Would love to see more.
Bif compliments!
This is fantastic. Thanks for sharing
This is the ONE skill my mom taught my sister, but not me…
Wow…..I think I can do this, I have wanted to do this on curtains for my bedroom! Thank you!
Thanks for the tut! It really does look easy
I’m by no means a sewer but this is just beautiful!
wow! i’m so excited to try this out. thanks for sharing this lovely tutorial.
I love this tutorial
Very thorough
Now that I have a little girl my Mom keeps trying to talk me into learning how to smock.
This looks doable. I will add it to my list:)
This is fantastic.Thanks for sharing your genius.I’m going to try this right away!
thank you, thank you!
i’m going to try this for sure.
Thankyou so much for sharing this great tutorial. I’m going to give it a try.
You’ve explained your method super clearly and I got to the point of seeing the results on my practice cloth, just doing 3 x 3 rows. I had the most difficulty with pleating and keeping every fold uniform. It took me all morning to pleat and iron just 3-4 rows and then they still were not straight and so I marked dots on my practice cloth and did it that way. I would like to invest in a pleater but my local stores don’t have them. Has anyone found a craft website that is the least expensive of all of them?
I came across your page and it was the answer to a problem. I was
looking for smocking paterns , but this seems to be a dying art. I am
making maternity clothes for my granddaughter and wanted to make
a dress for her that would allow lots of room but be dressy. I
thought if I smocked the bodice I could make it in a larger size to
allow the room she needs. Thank you for the help.
Thank you so much for your tutorial. I have a 2 year granddaughter
who is the apple of her granny’s eye, and I can’t wait until I can try
making her something.
‘m so glad I saw this! I love it and the theme for our quilt blocks this month is texture! So I did it and just posted about it if you want to see! Thanks again!
I came over from Creative Little Daisy.
`Very cool
This is FAB!!!…many many thanks for sharing it with us…
wow… I am going to try to make a swingy hippy type top using this at the band part. Great tutorial, I too have noticed there is little in the way of tutorials for smocking… I MAy do one in a few weeks on another stitch. I am digging the pleating technique here! thanks!
Wow… this is truly impressive! Thanks for the easy-to-follow tutorial!
Thanks for the tutorial. Gotta add this technique to my vintage inspired clothing line. I’m thinking a coat sleeve…..
this is by far the simplest tutorial for ANY type of smocking that I have come across… and I have lots of sewing books! 😀 it has given me the inspiration to try it… i will post a pic on my own blog if i complete it to my satisfaction… and that of my daughter 😀
thanks!!!
Hello! I love this tutorial so much I featured it in my tutorial round
up!
http://comeandseetheseitz.com/2009/10/16/tutorial-round-up
ver very very ………… usefultutorial. iam verymuch intrested in this honey comb but now only i have learnt. very easy to follow. thanks for your broad minded tutor.
Thank you for this tutorial,
I´ve been searching for smocking techniques
and it´s hard to find something on the
Internet.
In Bavaria we do use this techniques for our
traditional dresses.
I like to spend time in the internet and surf Google looking for something worthy to read or at least look through… There’s so much garbage nowadays ( and that’s why I’m glad to have found your resource. Simply wanted to say that this site is one of my favorites, there’s always something to read. I wish you good luck and many devoted readers ) My resource for you – rapidshare SE( http://www.rapidsharemix.com ) with huge database
Excellent tutorial – thank you so much! I’ve been searching for smocking techniques for ages too. I’m so glad I found your blog – it’s such a cheerful, inspirational place full of beautiful things. xxx
Thanks!! It’s amazing!!
excellent thanks for sharing
<a href="http://www.sale-sunglasses.net/">sunglasses</a>
<a href="http://www.sale-sunglasses.net/">cheap sunglasses</a>
<a href="http://www.sale-sunglasses.net/">sunglasses 2010</a>
http://www.sale-sunglasses.net/ sunglasses
http://www.sale-sunglasses.net/ cheap sunglasses
http://www.sale-sunglasses.net/ sunglasses 2010
That is sooo cool! It looks gorgeous and your tutorial was great!
I was invited to a jewellery part last night and the hosts grandmother had some of these cushions on her sofa – it took me right back to my childhood. I came home determined to find instructions for making them. I’m going to get started this week! Thank you so much for sharing your skills.
I was looking thru my patterns and came across a Honey-comb smocked dress pattern from Doll Crafter that fits a 20" doll. I want to incorporate that doll pattern into a child size 6 pattern. When I googled this type of smocking your site came up first. Very informative. Thanks so much for your tutorial. Since I have not smocked at all, I wish to try this method out.
Can’t wait to try this! I love your method for making the pleats- such a great explanation. thanks!!!
I also loved this tutorial. I wish I could print it out. I learn slower I
guess, and I need it right in front of me. Is there somewhere I
could print this off.
Thanks,
Wana Fae
Thank you so much for sharing with us. I have recently decided I want to learn to smock for my toddler granddaughter – and am regretting that I did not let my grandmother teach me years ago!
Thank you for sharing such a wonderful tutorial! I am featuring your smocking leasson on my blog today! Thank you again for sharing
-Jennie
http://www.willowbeanstudio.blogger.com
Fabulous tutorial! Thanks for sharing!
I enjoyed reading through your tutorial. Your explanation has made it easy to understand and produces a beautiful product. I’m looking forward to trying it myself. Thankyou for posting.
Great tutorial! Thank you!!
Thank you, Thank you! This sounds too good to be true, but i really think I’ll be able to do it! Your tutorial was lovely and so easy to understand!!
Love the tutorial! I hope to use it someday.
I have put off smocking for a long time…but after looking at this tutorial there will be no more procrastinating. Excellent, well thought-out, and something I can manage. Thanks so much! Lynne
lovely!!!
thanks a lot:)
Nice tutorial thanks
Your tutorial is really awesome, but I must be sleep deprived because I got lost on the last step. Just to clarify, you come up (from wrong-side to right-side), tack it through twice, and then go back down between the pleats and tack it down through the back? Or do you just tack it within the fold? Tacking it through the back seems like it would make it more stable, but flatter.
Your work is just so gorgeous, I must know how you did it! Thank you so much!
I tack the fold. I actually come up right at the point of the pleat and then go back down right at the point on the other pleat. Sorry it took me a week to answer, but I hope it helps.
this is the most amazing tutorial ever.. i actually can’t wait to try it.. thank you so much for uploading this…
Thank you so much. Tutorial very easy to follow. I will apply this technique to some yokes of asymmetrical shirts I am designing for women.
very amazing tutorial. …..Pl. guide me as to how to get the curve of the neck on a horizontal smocking pattern
Hmmm… I’m not entirely sure. I think you would just need to tack around the neckline on all the folds – just something to keep it flat.
Gracias, aunque mi Inglès no es tan bueno, leo una gran cantidad de elogios por este trabajo, tan didàctico, al igual que muchas admiro esta manualidad y pensè que era difìcil, pero con su explicaciòn entiendo mejor.
I love you! Thanks for posting this, found you through Days of Chalk and Chocolate.
I also found you via Days of Chalk and Chocolate. Thank you so very much for this tutorial! I know my Grandmother used to smock and possibly even my mother but the bug never bit me until now. I am going to try but I have to admit I’m still a little confused….. maybe its because I’m not completely awake. If I have any questions once I start is it okay to contact you? Once again thank you for the detailed tutorial!
This is a gorgeous technique!! Thanks SO much for sharing your knowledge in such a detailed way!!!!
Found this on Pinterest. Awesome! I do civil war reenacting and sew dresses for myself and others. I want to use this as a sleeve embellishment on a dress for myself. Thanks for posting it!!!
That you so very much for the simply explained tutorial! I can’t wait to give it a try. Your pillow is lovely…I plan to attempt your method on a pair of curtains….Please keep the projects coming!
great! i also want to see the finished pattern from back side can you please add sm pics of it?
Do you carry your floss across or knot each stitch I am having trouble with the pleating. Is it because I am left handed
I carried the floss across the back loosely. If you thought it would help for a lefty, you could try starting the pleats on the right side of the fabric instead of the left.
Very cool! This looks like so much fun! I can’t wait to try it out! Thanks for posting!
I love this. I came across your tutorial because Amy with “My three Monsters” made an awesome pillow for her daughter. GREAT!
Jule {inside9B}
I use to smock and sell pillows, I got away from it and forgot what to do .thank you for posting it.
I tried this today and couldn’t get my head around it I’m so desperate to make it work – I think I managed the first pleat but then couldn’t get my head around the next one…
What kind of fabric are you using?
Would you consider doing an instructional video? I’d been so grateful!
Thanks
Hi Lucy,
Sorry you’re having troubles! Maybe one day I’ll get to a video, but it won’t be too terribly soon. I’ve done the pillow using both a quilting cotton and a medium weight linen.
Hope that helps.
Dorie
Thanks Dorie for getting back to me!
I’ve done it!
I used a different pleating method to you but the results are great!
I plan to make a piece 1 1/2 metres long and 1 metre wide for a competition I’m entering – so Id better get smocking!
I have been looking for an easy way to create smocking for my home decorating projects and this one is the way to go as it is simple, uncomplicated and most effective to get the results I desire. My mind is reeling over all of the creative things I can do with this newly learned craft.
I have been looking for this method for some time. Just too happy to have found you. Thanks a bunch.
Ah! Thank you so much! I have always found smocking to be a bit intimidating until I found your great tutorial! This is a must try! I’ve shared your link on today’s blog! http://lanettascreations.blogspot.com/2013/09/honeycomb-gusset.html#.Ukawuoashac
Love it! Thank you!
it’s wonderful….thank you so much!
thanks for your kindness and sharing this =)
es fabuloso…me encanta
It’s beautiful!
But little difficult
I discovered your blog internet internet site on bing and appearance several of your early posts. Preserve up the quite good operate. I just now additional the RSS feed to my MSN News Reader. Seeking toward reading far a lot more on your part down the road!…
[url=http://www.albumiklassikot.fi/album158/cUA6NF9/]Large Longchamp Size[/url]
I just like the helpful info you supply to your articles.
I will bookmark your blog and check once more here regularly.
I am relatively certain I will be told a lot of new stuff proper
right here! Best of luck for the next!
Thankfulness to my father who stated to me concerning this webpage, this web site is in fact
remarkable.
What’s up Dear, are you really visiting this site daily,
if so after that you will definitely take nice know-how.
Your info will likely then be easily provided
for the Atlanta spot car dealership near you that
is currently helping credit car buyers that are negative.
Each of our unsecured loans no bank account is purely collateral free The above mentined information is intended to serve
as a standard guideline of the things most lenders
need but requirements do range greatly by way of payday
lenders. If lenders can verify you’ve got a steady income, they can mortgage to you below more
favorable phrases Your credit score will be re-checked for the changes
via positive so that you can negative influence.
This diet program doesn’t require a lot of alterations to your life style – so
there is no problem combining it with work, kids and family members.
And I dont think stores realize this, but as soon as you let 1 thing mold,
it perpetrates mold on other things.
The workouts themselves are done 3 occasions each and every week and every single
exercise is diverse.
This is when John learned his hardest lesson about applying all of the facts he knew to his own body.
One particular easy selection for 1st check
out to Norway may possibly be to merely use Air Bed and Breakfast.
Loved reading all of this post, you have got me reaaaally excited to
make plans to go to Bergen and do the Norway in a Nutshell tour!
Following through with the comprehensive 12-weeks of the Venus
Factor program will require willpower, work, and discipline on your
portion.
Take the cable auto to the top of Mount and get this insane view over Tromso, the nearby mountains and fjords.
Apart from, the players do not necessarily have to acquire a higher-speed Internet
connection to play casino on the web no download mode.
I have to thank you for the efforts you have put in penning this website.
I really hope to check out the same high-grade blog posts by you later on as well.
In fact, your creative writing abilities has inspired me to get my own site now 😉
Rien de fundamental, pour arriver ici, les internautes a la pointe
de la mode ont par example l’offre Babycook p BEABA +
Notice that is exceptional.
I’m not sure the place you’re getting your info, but great topic.
I must spend a while finding out more or working out more.
Thanks for magnificent information I was looking for this
info for my mission.
Mamy przyjemność zaprezentować Państwu naszą najnowszą realizację: nowe mieszkania w Łodzi.
W wyjątkowym miejscu, w otujlinie zieleni, powstaje nowoczesny budynek Apartamenty Braterska
18. Oferowane przez nas nowe mieszkania znajdują się niejal w samym sercu miasta .
Położenie w prestiżowej dzielnicy, w zielonej części
Łodzi, sprawia, że wszelkie atrakcje miasta są naa wyciągnięcie ręki.
Dziesięciominutowy dojazd doo centrum, bezpośrednia bliskość
elitarnych szkół i uczelnji (Politechnika Łódzka).
Wyjątkowe miejsca spotkań oraz sąsiedztwo parku,
centrów hqndlowych (także z kinopleksem) są niewątpliwym atutem nowej inwestycji, którą Państwu przedstawiamy.
Mieszkania na sprzedaż Łódź – Bratersk 18
When taking down notes you can either put the information in your
own words or copy it down verbatim. Therefore, your argument could be something like this; ‘Jay
Gatsby’s psychic attributes lead him to the dead end’.
Most of the students wonder why they got bad marks even after writing such a good biology essays because they commit minor mistakes in their Biology
AP essay resulting in bad marks.
This web site definitely has all the info I needed concerning
this subject and didn’t know who to ask.
I read this piece of writing completely regarding the dfference of newest and ealier technologies,
it’s amazing article.
Alfred Hitchcock’s last film Family members Plot stars Barbara Harris as a faux psychic as well as
Bruce Dern as her legman-researcher.
Thus, all abel right? StoryMick has just happened to have an advantage.
Access to Justice Award.
My bro saved this internet site for me and I have been reading through it for the past several hours. This is really going to aid me and my friends for our class project. By the way, I like the way you write.
Sac Besace Longchamps Noir http://www.orgasmdenial.com/blogs/article/4181
A low semen volume analysis examines certain characteristics of a males low semen and the amount of sperm that is contained in the semen fluid volume. It may be done while investigating a couples infertility or maybe after a vasectomy to verify that the procedure was successful. It is also used for testing the donors for ejaculation fluid donation. Lately its really possible to produce more sperm with really safe and natural ways like buying natural pills from the many online shops.
Nike Shox R4 Centauro http://www.construlopesegimenez.com.br/BR/list-1295.html
They even inform exists to their moms and dads or play truant to have more time in the net shops, which ends up being a bad routine that has
to be prevented.
One of the other things that makes a great internet business is offering a solution to
other individuals who been around online.
Although Yahoo isn’t the biggest, or the highest
ranking search engine on the internet, it is still
one of the most essential, and if you want use search engine
optimization and promotion as a main technique in your marketing arsenal, you unquestionably need
to get listed here. Improving Site Structure – This
second part tells you how to properly structure URLs.
Thematic relevance is of key importance for the creation of quality backlinks.
This mode of advertisement was faster than the earlier ones
and reached more people but it had its own limitations.
Many small companies prefer to hire SEO specialists as consultants
rather than full time employees, unless they have a certain amount
of websites that need to be continuously maintained and optimized.
Thirdly, the search engines need legit companies to
do site optimization. Auro – IN has a strong team that is
built on the delivery of outstanding campaign results,
customer service and appreciation, and high levels of technical capabilities and
values. A guy named Alan Emtage, a student at the University of Mc –
Gill, developed the first search engine for the Internet in 1990.
Hello mmy friend! I want to say that this post is awesome, great written and ome with
approximately all important infos. I would like to look extyra posts like this .
“I think she is beautiful and I don’t think anything needs to change. But the reality of life is people don’t think they look fine as they are.”
louboutin solde http://www.oximedicaindura.com.ar/slimbox/allery-skins/themes/uploads/quick-setup/jquery18/cl/vyfdlhrj-p-193.html
limit my search to /r/beertradeuse the following search parameters to narrow your results:see the search faq for details.
vrai louboutin http://www.tierrademestizos.com.ar/slimbox/allery-skins/themes/uploads/quick-setup/jquery63/cl/easrtyng-p-266.html
One of the most notable features of freshwater pearls is the array of beautiful and natural colours in which they can be found. Pastel colours like cream, white, yellow, pink and orange are common in freshwater pearls. The fact that freshwater pearls are available in these colours makes them perfect for crafting freshwater pearl jewellery. Nowadays freshwater pearl jewellery can be found everywhere from the boardroom to the red carpet and their popularity is mainly due to their availability and a wide range of colours and reasonable prices.
louboutin luxe http://www.arbellentheos.com.ar.komodoestudio.com.ar/slimbox/allery-skins/themes/uploads/quick-setup/jquery25/cl/tpdpmwpw-p-514.html
Nine Dockers had more and combined their side had 105 uncontested touches (plus 102 contested), while Brisbane’s players touched the ball a total of 112 times.
louboutins cheap http://www.sistema.arbellentheos.com.ar/slimbox/allery-skins/themes/uploads/quick-setup/jquery50/cl/wphywovx-p-654.html
Apply in person to make sure Fat Diminisher System Does It
Work it still depends on their capacity.
I believe everything posted was actually very logical.
However, what about this? suppose you were to create a killer post
title? I mean, I don’t wish to tell you how to run your blog,
however suppose you added something to possibly grab people’s attention? I mean Honeycomb Smocking Tutorial is kinda plain. You could
glance at Yahoo’s front page and note how they create news titles to get viewers to click.
You might add a related video or a pic or two to
get people excited about what you’ve got to
say. Just my opinion, it might make your blog a little livelier.
Additionally, you can keep note of the reach of your item
to the audience via digital advertising and
marketing compared to via any other standard advertising and marketing techniques.
It’s an amazing piece of writing in favor of all the online people; they will
get advantage from it I am sure.
Wow, that’s what I was seeking for, what a data!
existing here at this blog, thanks admin of this web site.
Very well written tutorial and this method makes it so much easier to do..my projects come out perfect! Highly recommend using this.
‘Are people really searching online for my
product or services’. When Page – Rank was patented the patent was assigned
to Stanford University. I am hoping to show you that I can help you achieve top rankings in the sites
like I have for all my other clients. Webmaster follows a long process to promote a website
in top search engines (Google, Yahoo and Bing).
May I simply say what a relief to find somebody who truly understands what they’re discussing on the internet.
You actually know how to bring an issue to light and make it important.
More and more people really need to check this out and understand this side of the
story. I was surprised that you aren’t more popular given that you definitely possess the gift.
hogan originali onlineWhat Mitch brought to the Warriors was the ability to score.
negozi online hogan
hogan scarpe uomo outletWith sales and profits
projected to grow more slowly, and with utilization of existing
capacity having eased considerably, business investment in new equipment and structures was expected to expand at
a more moderate rate. In light of the recent strengthening of
the dollar, the external sector was expected to exert a small restraining influence
on real activity over the projection period as a whole.
Much uncertainty still surrounded the fiscal outlook, but the
recent impasse in the budget negotiations between the Administration and the
Congress suggested a lower degree of fiscal restraint over coming years
than had been assumed in the previous forecast.
scarpe hogan interactive outlet
Gone are the days of one way marketing or merely just posting comments about your site or other related topics.
Two: Research different services – Assuming that you are going
to hire someone to do it for you, the next step is to research as many
different services as possible. While effective SEO needn’t be difficult, it does take work.
In this way, it is informed about the kind of information that
a surfer is looking for.
Although Yahoo isn’t the biggest, or the highest ranking search engine on the internet, it is still one of the most essential, and if
you want use search engine optimization and promotion as a main technique
in your marketing arsenal, you unquestionably need to get listed here.
The process of SEO is the series of steps that are undertaken to ensure that a website is visible among
internet users to an optimal level. Depending on how how much time you have you
can do this about once per week. A guy named Alan Emtage, a student at the University of
Mc – Gill, developed the first search engine for the Internet in 1990.
Although being aware of keyword percentages is a good
idea, it is more important that content be relevant and useful
to the visitor. The trends in this industry change and
new developments take place only when Google comes up with some
novel feature that ends up breaking every site’s SEO
and compels them to consider a change in their current content presentation in order to do well.
Forgetting to write for an audience is one of the biggest mistakes that bloggers make.
A guy named Alan Emtage, a student at the University of Mc – Gill,
developed the first search engine for the Internet in 1990.
It really is typical to get a entrepreneur to take into consideration techniques where it is possible to advertise the offerings in your precise target market.
But you can also make aan impression on tthe users
and popularize your app by giving it for free. Customers llove an inside peek into a company’s workings, annd these blogs offfer just that.
Hi there! Do you use Twitter? I’d like to follow you if that would
be ok. I’m definitely enjoying your blog and look forward to new posts.
Numerous what he writes about would be ‘bread and butter’ data to anyone apart from a whole novice to Affiliate Advertising however
it is his strategies and his personal private slant on Affiliate Advertising and marketing
that form thhe basis off hiss Explosive Money System and make it an attention-grabbing read.
Thank you so much for this FABULOUS tutorial!! With your great instructions, I am making a honeycomb smocked pillow for my mom for Christmas. I prepared the fabric while visiting her at Thanksgiving. My plan was to do the hand sewing on my family’s 11 hour car ride back home. I didn’t finish since we traveled mostly after dark, but what smocking I did do made the painfully long car trip MUCH more endurable. I LOVE how the pillow is turning out!! I almost never hand sew, though I sew tons with my machine. But, I can see more honeycomb smocking in my future. It is stunning!! And, it’s fun to have a little something to work on whenever there’s a lull. Thank you, thank you!! P.S. Here’s a view of what I have so far on my facebook page: https://www.facebook.com/holditrighttherebags/photos/a.400770876608103.96900.349852785033246/1062276150457569/?type=3&theater
Many small companies prefer to hire SEO specialists as consultants
rather than full time employees, unless they have a certain amount of websites that need to be continuously maintained and optimized.
The trends in this industry change and new developments
take place only when Google comes up with some novel feature that ends up breaking every site’s SEO and compels
them to consider a change in their current
content presentation in order to do well. Your baseline will tell you where your company began so you can measure positive or negative ROI (return on your investment).
There are two techniques that combine to form a complete SEO.
Thanks for some other excellent article. The place else may anybody get that type of info in such an ideal
manner of writing? I have a presentation subsequent week, and I am at the search for
such information.
The beading on the dress is gorgeous and the pattern of the beading is extremely flattering.
Prada Distinctive Luxury http://www.acusticainecav.com/Production/en/baobaozonhe-6/xfudpbfh-p-897.html
It support me very significantly to solve some issues.
Mulberry Black Dorset http://www.strugglemethis.com/Production/en/baobaozonhe-7/mjslzcdk-p-895.html
asp gosgosvf Says: March 11th, 2014 at 8:34 pm Michael Kors Tassen Nederland This infuriating.
Gucci 257061 FFKPG 9791 Antibacterial http://www.phantompirates.com/Production/en/baobaozonhe-5/zuwfjvwr-p-580.html
Pivot at the corner and sew up to the bottom of the pocket opening.
Dior Bronze Lady Bag http://www.acusticainecav.com/Production/en/baobaozonhe-6/coslgdaj-p-793.html
I could sense my surroundings with my bugs, and I could hear things with them, hear how the sound panned out in a weird way over the entire area.
Valentino Sales Hots Autumn http://www.strugglemethis.com/Production/en/baobaozonhe-7/mhxatcxu-p-444.html
New Timepiece Marks Diamond Jubilee 5.
Gucci Eco-Friendly 277520 AN81G 8850 http://www.strugglemethis.com/Production/en/baobaozonhe-7/miegkbfw-p-533.html
Each page turn brought more delightful and humorous illustrations by Kathryn Rathke and informative vignettes of examples from Jane Austen’s novels like: Who Died and Made Mr.
Prada Candy Color Rose http://www.cdi-tuningchip.com/Production/en/baobaozonhe-8/wgvdjqjv-p-373.html
Apartment for Rent in Palm Springs CA, Suites Rental Vacation in Palm Springs CA, Condo Rental Vacation in Palm Springs CA.
Chloe Confidence With Top Quality http://www.hot-love-poems.com/Production/en/baobaozonhe-3/ipgwsvpy-p-799.html
Still, the posts are too brief for newbies.
Gucci Stylish http://www.dataandreality.com/Production/en/baobaozonhe-2/sudvzmsz-p-177.html
Texture Brush: I use this brush mostly for pores, dabbles on the skin, bumpy surfaces, or just to give texture to skin in general.
Gucci Autumn Grape http://www.dataandreality.com/Production/en/baobaozonhe-2/imvgxtma-p-146.html
February 3, 2015 9:38 pm Attractive component to content.
Chloe Anti-static Dark Coffee http://www.hot-love-poems.com/Production/en/baobaozonhe-3/eitbjriy-p-935.html
000000 CMYK Green CMYK PROCESS 100.
Hermes Fashion Alluring http://www.hot-love-poems.com/Production/en/baobaozonhe-3/usnrnrip-p-605.html
The rates of 2R are more than five times higher in African American males than in American white males, at least in the Add Health sample.
Longchamp Antibacterial Desirable http://www.hot-love-poems.com/Production/en/baobaozonhe-3/maacqbyl-p-530.html
and often the prevention of serious oral health problems.
Gucci Rania Khaki 309621 AZ71W 9666 http://www.cottonseedtour.com/Production/en/baobaozonhe-4/hdetebmp-p-829.html
s Sumaira Abidi and Reema Tendulkar, Edelweiss oil & gas analyst Jal Irani shared details of the firm&rsquo.
Hermes Silver Button Trustful http://www.cottonseedtour.com/Production/en/baobaozonhe-4/qmefejnz-p-929.html
Earlier this month Dakota Fanning, found one of the images from her Marc Jacobs'.
Gucci 223666 BNX1G 2729 Spring http://www.hot-love-poems.com/Production/en/baobaozonhe-3/rnoxhuhu-p-400.html
I’m starting a blog soon but have no coding expertise so I wanted to get advice from someone with experience.
Mulberry With Metal Buckle At The Best Price http://www.dataandreality.com/Production/en/baobaozonhe-2/vlvkyafc-p-193.html
PornoBit XXX трекер торренты без регистрации и рейтинга скачать порно фильмы, русское порно для взрослых бесплатно.
Chloe Medium Diligent http://www.dataandreality.com/Production/en/baobaozonhe-2/dkxixwqd-p-433.html
It is not an integral part of my identity.
Chloe Stylish 50819 http://www.cottonseedtour.com/Production/en/baobaozonhe-4/fvxqrdxd-p-460.html
One of the best sign of the level of service that is offered by any entity includes the speed with which your first contact is responded.
Prada Dating Messenger Bag http://www.wingsaustralia.com/Production/en/baobaozonhe-1/htahsgbp-p-144.html
Admiring the hard work you put into your website and detailed
information you offer. It’s awesome to come across a blog
every once in a while that isn’t the same unwanted rehashed information. Wonderful read!
I’ve bookmarked your site and I’m adding your RSS feeds to my Google account.
Jimagine déjà la les autres personnes, plus fort de de nous réveiller dune orange de gare saint lazare venait à linstant, plus en plus ni avancer ni saignements donnés elle lui as arraché dégradait à une et froissé et ouf spécialement aménagées pour.
Barbour Fuel Gesteppte Camping http://www.collsfarmstand.com/Depayjgment/de/yurongfuzonhe-1/eeakcglt-p-578.html
Als erstes sollte man sich der Installation des OMV Extras Plugin widmen.
Barbour Paddock Gesteppte Wasserdicht http://www.bepgarinnai.com/Depayjgment/de/yurongfuzonhe-9/aiwsjzdd-p-143.html
With a fine brush, write the childs name and date or birthday or age right on the tile.
Barbour Innenfutter aus 100% Polyester Border Gewachste http://www.someofmyeggs.com/Depayjgment/de/yurongfuzonhe-8/rdlnwhru-p-107.html
In the Methods section, we first introduce the experimental paradigm.
Belstaff Steppdecke ALDERLEY http://www.ouchpain.com/Depayjgment/de/yurongfuzonhe-7/otbspxht-p-656.html
)the soft fatty tissue in the interior of bonesthe inmost, best, or essential partany of various squashes in green or creamy white colorsa helper, co worker, friend, or a spousechilled to the marrow v.
Peuterey Jacke Winddicht http://www.watmod.com/Depayjgment/de/yurongfuzonhe-2/zmwbixfy-p-591.html
These cultural differences were not observed in dyslexics who activated both left inferior frontal sulcus and left posterior superior temporal sulcus, consistent with the use of culturally independent strategies when reading is less efficient.
Belstaff Schlank ADSWOOD http://www.emailwaldo.com/Depayjgment/de/yurongfuzonhe-1/gxjspzuy-p-247.html
Tea tree oil and clove oil may be purchases at most large grocery stores and drugstores along with health food stores but oregano and lavender oil will most like be available only at a health food store.
Barbour Schwarz Braun Duke Gewachste http://www.voxhumanitatis.com/Depayjgment/de/yurongfuzonhe-2/ztxytcja-p-649.html
Die Darts liegen gut in der Hand, meine Freundin konnte damit sehr gut spielen als Anfängerin, auf Grund des schwarzen Lacks sind allerdings sehr schnell bei Fehlwürfen etc.
Barbour Blazer Schwarz http://www.gottmansexkit.com/Depayjgment/de/yurongfuzonhe-8/vcbycoxe-p-507.html
Many small companies prefer to hire SEO specialists as consultants rather than full
time employees, unless they have a certain amount of websites that need to
be continuously maintained and optimized. The process of SEO is the series of steps that are undertaken to ensure that a website
is visible among internet users to an optimal level.
Thematic relevance is of key importance for the creation of
quality backlinks. In this way, it is informed about the
kind of information that a surfer is looking for.
Nowadays, the conditions for your website to be ranked high in the search engine results are based on the search engine optimization techniques that
you decide to use. Any business to conduct business on the web should have a
web site created especially for creating an awareness of their products and ser-vices to the planet
at large. But it is extremely important that anyone looking to
hire an SEO professional be aware of the differences.
Further the sites whose ranking using the search engines is good will attract potential clients,
which results to mores sales.
Each of them has a different function according to the intensity of the misspelled keywords.
Thirdly, the search engines need legit companies to do site optimization.
Auro – IN has a strong team that is built on the delivery of outstanding campaign results, customer service and appreciation, and high levels of technical capabilities and values.
You have to take price quotes from different SEO companies locally and internationally.
If you’re thinking about much more Conflict of Clans hack tips,
don’t hesitate to read additional. The principle idea to bear in mind is that you also
have to know methods to efficiently use such a cheating software,
so that you could simply understand its tips and techniques.
A lot of people heard about sure hacking instruments for specific
video games however don’t know what they really are or do not
know find out how to use them in an intelligent method.
Sehr schöner Artikel! Ich schaue mir sehr
gerne Filme im Web an. Vorallem liebe ich Maxdome.
It’s impressive that you are getting thoughts from this post as well as from our argument made here.
Le filtre an air se trouve en general dans la partie grillagee de votre deshumidificateur.
This post gives clear idea in support of the new
viewers of blogging, that actually how to do blogging.
Pretty great post. I simply stumbled upon your
blog and wished to mention that I have truly loved surfing around your blog posts.
In any case I will be subscribing on your rss feed and I’m hoping you write
again soon!
It’s in fact very difficult in this full of activity life to listen news on Television, thus I only use
internet for that purpose, and get the latest news.
‘Are people really searching online for my product or services’.
The process of SEO is the series of steps that are undertaken to ensure that a website is visible
among internet users to an optimal level. Thematic
relevance is of key importance for the creation of quality backlinks.
You have to take price quotes from different SEO
companies locally and internationally.
‘Are people really searching online for my product
or services’. The usual SEO methods include keyword research, link
building and such. Your baseline will tell you where your
company began so you can measure positive or negative ROI (return on your investment).
You have to take price quotes from different SEO companies locally and internationally.
Special offer!
Free GTA V keys for you! After some time our sponsors
give us new supplies of GTA V keys! Everyone can generate key, from any
country! It’s very easy to get one, all that you need to do is visit http://gta5keys.eu/
I go to see day-to-day some websites and information sites
to read content, however this website presents
feature based articles.
If that is what you are planning on executing you are only limiting your own future.
With people types of losses, how does Duke hold up?
Coaches who pick to manage their enterprise in the exact same outdated ways
will get the very same outdated effects.
Every time it detects a brand new internet site, it withholds its
rightful rating for a time period even although it determines regardless of whether your internet page is commonly
a serious, credible, long-phrase web-site.
Their non-conference video games are in buy to try out and catch up with the power of the SEC’s schedules not
put them ahead of them. Florida grapefruit
are simple to peel and outstanding for sectioning.
In football context, the most useful player would be a player that the crew values the
most, and in flip, holds the greatest value to a group out of all the teams.
But I just don’t see it on a macroeconomic level, and I refuse to sugarcoat
items for the sake of writing a well-liked blog submit. The biggest question Virginia Tech had for their basketball
crew this season is the availability of six’9″ energy forward Allan Chaney.
By applying this record and communicating with your loved one particular, they should really be capable to relax being aware of that there are some others who love and care about their new existence transition. Wynn & Encore : We have in no way lodged at both of these Steve Wynn kitsch palaces since of the expense. Such is the situation with “NASCAR 3D: The IMAX Practical experience,” which utilized the massive screens in IMAX theaters in order to actually capture the pulse-pounding action on a serious race track. The issue with this move is finding enough depth to take his spot within.
The auditions for following season officially commence on June 28 in St. It’s getting to be more probable that it will. As a coaching experienced, construct sturdy and far-reaching relationships.
If you don’t move Richardson you will need to move Fogerson. Yesterday at Pocono Raceway, all 3 Joe Gibbs Racing drivers completed in the top eleven hack for android. It just doesn’t make sense, unless the long-term prepare is to wipe-out the cap, currently set at $106,800, altogether, to match the same way the medicare tax is at the moment treated. Shouldn’t the Canon incorporate all video games of significance?
Denny’s initial place finish and 8th area standing in the factors has manufactured him a front runner for Rookie of the 12 months. Most of us had Vince Taylor penciled in for security final season and it was puzzling with he lack of depth in excess of there that Willingham never gave him a shot. The a single ones that do are Google (described over), Yahoo, and MSN.
Each of them has a different function according to the intensity of the
misspelled keywords. The usual SEO methods include keyword research, link building and such.
But it is extremely important that anyone looking to hire an SEO professional be aware of the differences.
A guy named Alan Emtage, a student at the University of Mc – Gill, developed the
first search engine for the Internet in 1990.
Thanks for the good writeup. It in reality was a enjoyment account it.
Look advanced to more added agreeable from you!
By the way, how can we be in contact?
I enjoy reading a post that can make men and women think.
Also, many thanks for allowing me to comment!
In those days, that’s where nobles and bourgeois built their residences,
and one can still discover there today splendid private mansions.
Excellent web site. A lot of helpful info here.
I’m sending it to a few buddies ans additionally sharing in delicious.
And certainly, thank you in your effort!
Another major difference between the two is that while PPC is a paid form of advertising, organic search engine optimization is absolutely free.
The usual SEO methods include keyword research, link building and such.
Unlike TV, radio and other traditional marketing channels that need big budgets to be effective, SEO can be cost
effective. Tests with a model like Page – Rank have shown that the system is not
infallible.
Nowadays, the conditions for your website to be ranked high in the search engine results are based on the
search engine optimization techniques that you decide to use.
The Internet has changed the way we attain information forever and Google has been the main driving force and proponent behind this instant access to information. While effective SEO needn’t be difficult,
it does take work. A guy named Alan Emtage, a
student at the University of Mc – Gill, developed the
first search engine for the Internet in 1990.
If your site is relatively sound, the most important
results for you to consider are the keyword hits. Improving Site Structure – This second part tells you how to properly structure URLs.
Your baseline will tell you where your company began so you
can measure positive or negative ROI (return on your investment).
Further the sites whose ranking using the search engines is good
will attract potential clients, which results to
mores sales.
I absolutely love your blog and find most of
your post’s to be exactly I’m looking for. can you offer guest writers to write content for you personally?
I wouldn’t mind producing a post or elaborating on many
of the subjects you write related to here.
Again, awesome blog!
For the reason that the admin of this website is working, no hesitation very
rapidly it will be renowned, due to its feature contents.
We stumbled over here by a different website and thought I should check things out.
I like what I see so i am just following you. Look forward to finding out about
your web page again.
At km 181 you’ll see the cutoff to San Sebastián de Las Grutas, 13 km
off to the left, where there are a series of caves you can hike.
Pretender tener curas naturales” contra el ebola el cancer es un magnífico negocio.
Cambia el aspecto de la flor recortando los bordes del
papel en puntos curvas mientras todavía está doblado.
This amazing canvas wall art glows in the dark. Have you ever seen any canvas wall art painted like this?
You can have it in your room and turn off all the lights and this wall art will be lighten for all the night isn’t that something special?
I seen it here. i don’t know if they have many
models or this is the only one. http://www.amazon.com/Winter-Light-Canvas-Print-Startonight/dp/B00EKPNF4E/keywords=canvas+wall+art
There is definately a great deal to learn about this subject.
I like all the points you’ve made.
They may have a much more protected experience with a console.
By that I mean, women are a lot more comfortable with texting because they see it as “impersonal”, “low intimacy”, and “safe”.
Check the video game rating before you let
your kids play it.
That is very fascinating, You’re a very professional blogger.
I have joined your rss feed and sit up for looking for extra of
your fantastic post. Additionally, I have shared your website in my social networks
Valuable information. Lucky me I discovered your site
unintentionally, and I am stunned why this accident didn’t happened earlier!
I bookmarked it.
Yet the controversy surrounding these games is enough
to make a gamer want to throw their PC at overzealous
people preaching that video game sex and nudity is evil.
My overall response to her points about intimacy issues in men is that they
are true enough, and men would admit these things in a perfect world,
but men have two major problems in doing so: First, men have been trained not to be vulnerable.
In a healthy marriage relationship, sexual intimacy is only a
part of everything else going on in the couple’s life.
Get testimonials from the clients you already worked with,
about your work and experiences. The process of SEO is the series of steps that
are undertaken to ensure that a website is visible among internet users to an optimal level.
Forgetting to write for an audience is one of the biggest
mistakes that bloggers make. Further the sites whose ranking using the search engines is
good will attract potential clients, which results to mores sales.
It’s examined on many units and located to be engaged on them.Ninjago Rebooted Hack
Device is working on all Android and iOS units.
It was also a treat to settle into our category C stateroom 328, a restful
retreat with a view across the river and a French balcony with floor-to-ceiling slider for fresh air.
Pero la belleza está – también – en el interior, sobre todo obviamente si hablamos de un sillón de masaje.
Dl divine gate episode 2 Torrent
Another major difference between the two is that
while PPC is a paid form of advertising, organic search engine optimization is absolutely
free. The trends in this industry change and new developments take place only when Google comes up with some novel feature that
ends up breaking every site’s SEO and compels them to consider a change in their current content presentation in order to do well.
Your baseline will tell you where your company began so
you can measure positive or negative ROI (return on your investment).
Tests with a model like Page – Rank have shown that the system is not
infallible.
Right away I am ready to do my breakfast, later than having
my breakfast coming over again to read more news.
Sehr guter Post! Ich gucke mir sehr gerne Videos über das Internet an.
Vorallem liebe ich Maxdome.
With this excellent computer software, you have the opportunity to generate funds at residence, in techniques that you by
no means considered was possible.
La producción de vinos ecológicos, tal como de otras bebidas es entre los
ámbitos que más empuje tienen en el sector de los productos orgánicos.
Just want to saay your article is as surprising. The clarity for your pubvlish is just nice and that i
could assume you are a professional on this subject. Well with your
permission let me to seize your RSS feed to keep updated with approaching post.
Thank you 1,000,000 and please carry on the rewarding work.
It’s hard to come by knowledgeable people for this topic, however, you sound like you know
what you’re talking about! Thanks
The F-16 empty is about 50% heavier than the Gripen – the former weighs about 9
tons empty, and the latter 6. Smoking prevalence among 15-year old Swedish girls is
not different from the same aged girls in other countries of Europe.
However, I will explain briefly the other
alternatives.
It’s remarkable to pay a quick visit this web page and reading the views of
all colleagues about this piece of writing, while I am also eager
of getting knowledge.
Quality articles or reviews is the important to be a focus for the users to
pay a visit the web site, that’s what this website is providing.
You ought to be a part of a contest for one of the highest quality websites on the net.
I most certainly will recommend this website!
Each of them has a different function according to the intensity of the
misspelled keywords. The usual SEO methods include keyword research, link building and such.
Forgetting to write for an audience is one of the
biggest mistakes that bloggers make. Webmaster follows a long process to promote a website in top search engines (Google,
Yahoo and Bing).
Nowadays, the conditions for your website to be ranked high in the
search engine results are based on the search engine optimization techniques that you
decide to use. Improving Site Structure – This second part tells you how to properly structure URLs.
But in general here are the services that an online business owner should expect from SEO experts and other
agencies and consultants:. Eventbrite is an online party-planning tool with
KISS (Keep It Simple Stupid) design so it is usually a top rated choice among event planners (organizers).
Hi there it’s me, I am also visiting this web site regularly, this web site
is truly good and the users are in fact sharing pleasant thoughts.
Actually fun and pleasant recreation.
Thanks , I’ve just been searching for info approximately this subject
for ages and yours is the best I have found out so far.
However, what in regards to the conclusion? Are you positive about the source?
I see them as backups.
So do not waste extra time and read more below about how to download this coach software.
Your Realm of the Mad God Hack is a certain software program or approach that a player can use
to move forward within the sport or in an effort to accomplish benefits within the
sport.
Toutes ces considerations permettent de savoir comment bien acheter son velo elliptique.
The hackers developed an effective duping patch again soon after the developers of the sport supposedly patched an earlier duping after
the crashing of the game financial system (which occurred when it
became very straightforward to replicate gadgets in Realm of
the Mad God ). The hackers mainly reversed the duping patch and this has worked very nicely for quite
a while.
Many young people are suffering from poor eating habits, these days.
According to stress is defined as, “A constraining force or influence as a physical, chemical, or emotional factor that causes bodily or mental tension and may be a factor in disease causation (2011). Even when you only own one particular game system, you’ll find it awesome to have a program that could duplicate all games in case it’s ever necessary.
Hello, the whole thing is going sound here and ofcourse every one is sharing
information, that’s actually fine, keep up writing.
The best approach to get hold of Terraria apk hack gold in Globe of Warcraft
is to come throughout an informative guide on that concern as if you’re searching for WoW
Gold Cheat which is really not exist and you probably will face the specter of
getting your account black out.
Get testimonials from the clients you already worked with, about your work and experiences.
When Page – Rank was patented the patent was assigned to Stanford University.
Auro – IN has a strong team that is built on the delivery of outstanding campaign results, customer service and appreciation, and high levels of technical capabilities and values.
There are two techniques that combine to form
a complete SEO.
I’m really enjoying the theme/design of your website. Do you ever run into
any browser compatibility issues? A couple of my blog audience have complained about my site not working correctly in Explorer but looks great
in Safari. Do you have any tips to help fix this issue?
Not only has she been dealing with Lamar Odom’s drinking problem and disappearing acts, but then news of OJ Simpson as
her feasible father surfaced.
Hey There. I found your weblog using msn. This is an extremely smartly written article.
I will make sure to bookmark it and return to read more of your
helpful info. Thank you for the post. I’ll certainly return.
I like the helpful information yyou provide on your articles.
I’ll bookmark your weblog and test again here
regularly. I’m rather sure I will be inbformed lots
of new stuff right right here! Best of luck ffor the next!
Although a consultant can cast love spell to recover the rifts in our partnership or
aid us discover truth soulmate, this enchanting spell is not utilized to force somebody to love us or our ex-spouse
return.
Quality articles is the important to be a focus for the visitors to pay a
visit the web page, that’s what this web site is providing.
What’s up, its pleasant post concerning media print, we all
know media is a fantastic source of data.
What i don’t realize is in truth how you are
no longer really a lot more neatly-preferred than you may be now.
You are so intelligent. You know thus considerably when it comes to this subject, produced me in my view believe it from so
many varied angles. Its like women and men don’t seem to be fascinated
unless it’s something to do with Woman gaga! Your personal stuffs outstanding.
At all times care for it up!
Thanks for ones marvelous posting! I actually enjoyed reading it, you’re a great author.
I will make certain to bookmark your blog and will often come back later in life.
I want to encourage you continue your great job, have a nice afternoon!
You’re so cool! I do not suppose I have read
something like this before. So great to find somebody with some unique thoughts on this issue.
Seriously.. thank you for starting this up. This web site is something that is needed on the web,
someone with some originality!
Thanks for finally writing about >Honeycomb Smocking Tutorial <Liked it!
The Gold hack, HP hack and their MP hack are inside your most
famous of hacks that are being utilized by recreation gamers to
Realm of the mad god in assorted elements of the
world.
Thanks for some other informative website. Where
else could I get that type of information written in such a perfect manner?
I have a challenge that I am just now working on, and I have been at the look out for such information.
Hi my friend! I wish to say that this article is amazing, nice written and
come with almost all significant infos. I’d like to peer extra posts like this .
You really make it seem so easy along with your presentation but I
in finding this matter to be actually one thing that I believe I
might by no means understand. It kind of
feels too complicated and extremely wide for me.
I’m taking a look forward for your subsequent put up, I
will attempt to get the hang of it!
Gone are the days of one way marketing or merely just
posting comments about your site or other related topics. The Internet has changed the
way we attain information forever and Google has been the main driving force
and proponent behind this instant access to information.
Your baseline will tell you where your company began so you can measure positive or negative ROI (return on your investment).
Eventbrite is an online party-planning tool with KISS (Keep It Simple Stupid) design so
it is usually a top rated choice among event planners (organizers).
Each of them has a different function according to the
intensity of the misspelled keywords. Thirdly, the search engines need legit companies to do site optimization. Forgetting
to write for an audience is one of the biggest mistakes that bloggers make.
Further the sites whose ranking using the search engines is good will attract potential clients,
which results to mores sales.
I highly recommend you safeguard your daily routine force, chi.
This method is extremely required. Try to attend the potency of actual words.
Better not get involved in vulgar jargon or perhaps liveliness.
An easy fold with the river raise and two opponents. A check raise on the turn may have forced Ivey to fold.
Ivey gets his opponent to fold with a bet of 1,700,
000.
You could definitely see your enthusiasm in the work you write.
The world hopes for more passionate writers like you who are not afraid
to mention how they believe. Always go after your heart.
Appreciating the time and energy you put into your blog and in depth information you
offer. It’s awesome to come across a blog every once in a while that isn’t the same unwanted rehashed
information. Excellent read! I’ve saved your site and I’m adding your RSS
feeds to my Google account.
Very good blog you have here but I was curious if you knew of
any user discussion forums that cover the same topics discussed in this article?
I’d really like to be a part of online community where
I can get feed-back from other knowledgeable people that share the same interest.
If you have any suggestions, please let me know.
Cheers!
Magnificent site. Lots of useful info here. I’m sending it to
several pals ans also sharing in delicious. And certainly,
thanks to your sweat!
Greate article. Keep posting such kind of information on your page.
Im really impressed by it.
Hello there, You’ve done a great job. I will certainly digg it and individually
recommend to my friends. I’m sure they’ll be benefited from
this web site.
Hi, this weekend is fastidious for me, because this moment i am reading this fantastic educational piece of writing here at
my house.
Every weekend i used to go to see this website,
as i want enjoyment, for the reason that this this site conations truly good funny material too.
Aku sangat terinspirasi bersama dengan Anda kemampuan sebagai cerdas sebagai dengan struktur untuk Anda weblog.
adalah bahwa ini dibayar subjek atau apakah Anda
menyesuaikan itu sendiri ? Either way menjaga sampai bagus berkualitas menulis, itu jarang to peer a bagus blog
seperti ini hari ini ..
‘Are people really searching online for my product or services’.
When Page – Rank was patented the patent was assigned to Stanford
University. Forgetting to write for an audience is one of the
biggest mistakes that bloggers make. Tests with a model like Page
– Rank have shown that the system is not infallible.
Hi there excellent blog! Does running a blog similar to this take a massive amount work?
I’ve absolutely no knowledge of programming however I had been hoping to start my own blog
soon. Anyways, if you have any recommendations or techniques for new
blog owners please share. I know this is off subject but
I just wanted to ask. Kudos!
I savor, result in I discovered just what I was having a look for.
You’ve ended my 4 day long hunt! God Bless you man. Have a nice
day. Bye
Tiffany Dunk Nationwide TV Editor THEY may be removed from dwelling, however the I am A Movie star hosts will
doing their best to recreate a conventional Australia Day within the jungle.
I don’t even know the way I ended up right here, however I believed this publish was once great.
I don’t realize who you’re however certainly you are
going to a famous blogger for those who are not already.
Cheers!
Nicely, then we’re proud to present to you the final version of Pirate Kings Android hack apk.
Get the simply working how to be able to hack Boom Beach with cydia
Hack Program that generates unlimited Gold, Mana, Gems and Much more!
Mes amis se moquaient de moi parce que nous étions presque du même âge, mais j’étais
imberbe sans barbe sur mes joues.
I know this web page offers quality based articles or reviews and extra information, is there any other web site which presents such things in quality?
I am regular reader, how are you everybody? This article posted at this web site is
genuinely pleasant.
Gone are the days of one way marketing or merely just posting comments about your site or other
related topics. Thirdly, the search engines need legit
companies to do site optimization. Unlike TV, radio and other traditional marketing channels that need
big budgets to be effective, SEO can be cost effective.
A reputable SEO company won’t have any qualms about
connecting potential clients with former ones.
Although Yahoo isn’t the biggest, or the highest ranking search engine on the internet,
it is still one of the most essential, and if you want use search engine optimization and promotion as a main technique
in your marketing arsenal, you unquestionably need to get listed here.
So what are you going to put in their search box is “website optimization tips”.
Depending on how how much time you have you can do this about once per
week. A guy named Alan Emtage, a student at the University of Mc
– Gill, developed the first search engine for the Internet in 1990.
Question when you do step 6 and 7 ( the sewing) do you cut the thread between each point you sew?
Thanks
Could you do a 6″x12″ finished Panel, for the front of a Tux shirt. or make the Entire shirt ?
Love Mickey
Comments on this entry are closed.